Sunday, October 19, 2014

OUTPUT_X(value); NOT WORKING


   HOME    I  ALL IN ONE TAB


OUTPUT_X(value); NOT WORKING

BUT WORKING NOW


                                           OUTPUT_X(value); not working ccs c compiler the I found an idea that is ORing the value ( you do any other arithmetic                    and logic operation to get same value to output)


I2C in ARDUINO UNO & PIC Microcontroller with Proteus simulation


HOME    I  ALL IN ONE TAB


I2C in ARDUINO UNO & PIC Microcontroller with Proteus simulation


ARDUINO UNO


PIC Microcontroller


Simulation files :

1. ARDUINO UNO R3          - DOWNLOAD

2. PIC MICROCONTROLLER - DOWNLOAD

3  FILE BUNDLE -------(ALL FILES )

                      ARDUINO   :   DOWNLOAD

                      PIC           :    DOWNLOAD

Explanation about I2C


The physical I2C bus
                     

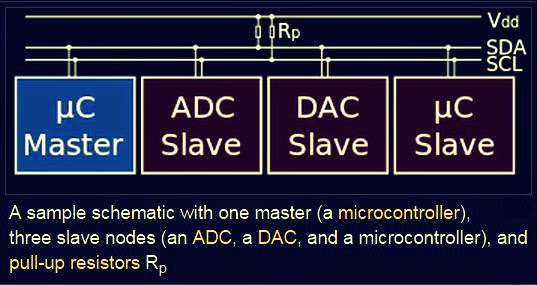
                                           This is just two wires, called SCL and SDA. SCL is the clock line. It is used to synchronize all data transfers over the I2C bus. SDA is the data line. The SCL & SDA lines are connected to all devices on the I2C bus. There needs to be a third wire which is just the ground or 0 volts. There may also be a 5volt wire is power is being distributed to the devices. Both SCL and SDA lines are "open drain" drivers. What this means is that the chip can drive its output low, but it cannot drive it high. For the line to be able to go high you must provide pull-up resistors to the 5v supply. There should be a resistor from the SCL line to the 5v line and another from the SDA line to the 5v line. You only need one set of pull-up resistors for the whole I2C bus, not for each device, as illustrated below:


Masters and Slaves


                           The devices on the I2C bus are either masters or slaves. The master is always the device that drives the SCL clock line. The slaves are the devices that respond to the master. A slave cannot initiate a transfer over the I2C bus, only a master can do that. There can be, and usually are, multiple slaves on the I2C bus, however there is normally only one master. It is possible to have multiple masters, but it is unusual and not covered here. 

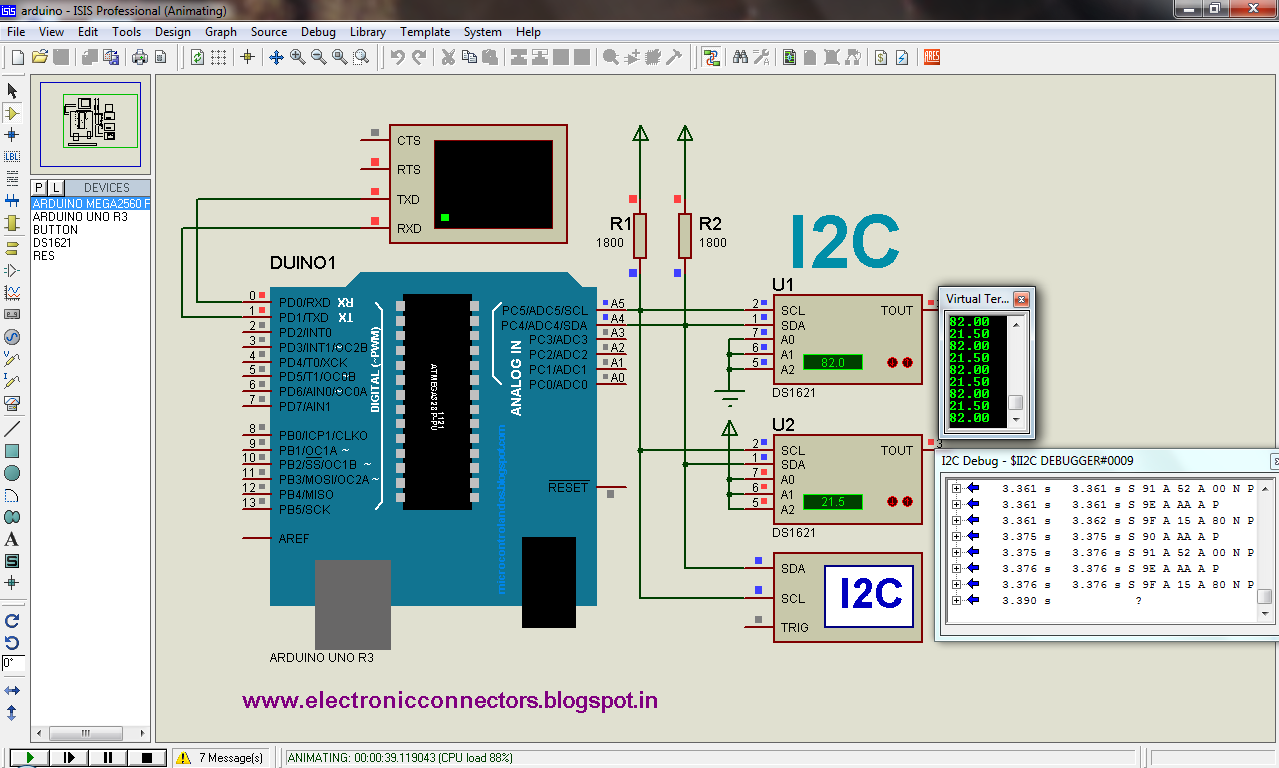
Here master is arduino uno and pic microcontroller , DS1621 is slaves

For example,


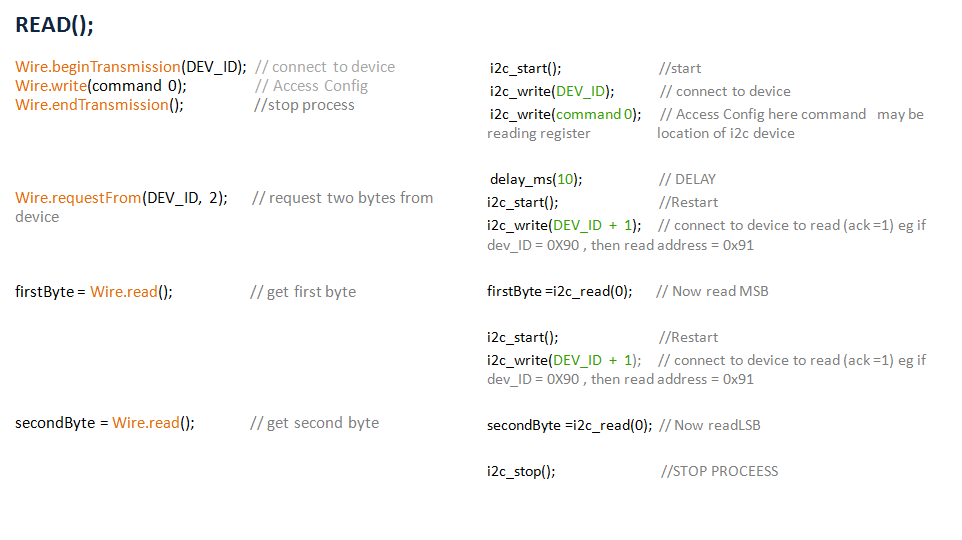
Software protocol


                            ARDUINO UNO R3(Arduino IDE 1. 57) Vs PIC MICROCONTROLLER(CCS C compiler)


ADDRESSING OF DS1621


                   DS1621 DEVICE_ID(DEV_ID) is Higher nibble is 9h(1001) and lower nibble(A2,A1,A0) is optional for selecting more than on DS1621 on I2C BUS and last bit indicating write or read (R/W)


You must know the "COMMENT SET" or "ACCESS CONFIG" of  DS1621 IC


THANK U FOR WATCHING AND DOWNLOADING ............


Saturday, August 16, 2014

ARDUINO LIBRARY FOR PROTEUS SIMULATION


HOME    I  ALL IN ONE TAB


 download


L293D Bidirectional DC Motor Control USING PIC ,SIMULATED IN PROTUES

HOME    I  ALL IN ONE TAB

L293D  Bidirectional DC Motor Control
Using PIC16f877a


Simulation files :

1. Protues design file - DOWNLOAD
2. Hex files               - DOWNLOAD


                          The L293D is designed to provide bidirectional drive currents of up to 600-mA at voltages from 4.5 V to 36 V. Here we control two DC motors using L293D  quadruple high-current half-H drivers.
with PIC16F877A micro controller . working diagram of L293D is given below


                  To control the speed motor we generate PWM signal from PIC , The bidirectional control of motor by high and low state other digital signal from PIC, here we use inverting of duty of pwm when changing one direction to opposite direction for maintaing the speed of motor. 


signal output from virtual CRO given below


Saturday, January 25, 2014


HOME    I  ALL IN ONE TAB

      Vande matharam tone generated from Arduino Uno R3        


"   HAPPY REPUBLIC DAY   "


               Vande Mataram (Bengali: বন্দে মাতরম্‌, Sanskrit: वन्दे मातरम्) - Vande Mātaram - literally - "I bow to thee, Mother" - is a poem from Bankim Chandra Chattopadhyay's 1882 novel Anandamath. It was written in Bengali and Sanskrit.

It is a hymn to the Mother Land. It played a vital role in the Indian independence movement, first sung in a political context by Rabindranath Tagore at the 1896 session of the Indian National Congress.

In 1950 (after India's independence), the song's first two verses were given the official status of the "national song" of the Republic of India, distinct from the national anthem of India, Jana Gana Mana.

Download the files for "vande matharam " tone generation in arduino uno r3 on proteus vsm software. 


Simulation files :

1. proteus design file - DOWNLOAD
2. Hex code file        - DOWNLOAD
3. FILE BUNDLE    - DOWNLOAD  (Contain all files you need)

THANK YOU FOR DOWNLOADING ...
HOME    I  ALL IN ONE TAB

Arduino tone generation 


        Using arduino tone library in arduino we can make midi tone in arduino uno r3 board . Here i introduced the small project to hear midi tone from arduino uno r3 using proteus vsm simulation. download the proteus design file and hex code for tones to generate tone from arduino uno r3

Simulation files :

1. Protues design file - DOWNLOAD
2. Hex files
                                  a) Vande matharam       - DOWNLOAD
                                  b) Mission impossilble   - DOWNLOAD
                                  c) thumbi vaa                - DOWNLOAD
                                  d) Lollipop                    - DOWNLOAD
                                  e) Thriller                      - DOWNLOAD

More hex files will upload soon

HOME    I  ALL IN ONE TAB


Humanoid Robotic Hand Using Arduino 


           Humanoid robotic hand is the artificially created mechanical hand visually similar to human hand, it can moves like human hand with the help of motors and  motors are controlled by  advanced microcontroller with programming. The simulation of humanoid robotic hand with proteus vsm software as shown in video .
Here i used 21 servo motos with 21 corresponding potentiometer.

The proteus design and hex files are given below :

1. Proteus design file     - DOWNLOAD      ( password will release soon )
2. Programme code file  - DOWNLOAD

                                                                                                                                                     THANK YOU FOR DOWNLOADING

Explanations :

1. Robotic arm controller - Arduino Mega 2560


      The Arduino Mega 2560 is a microcontroller board based on the ATmega2560 . It has 54 digital input/output pins (of which 15 can be used as PWM outputs), 16 analog inputs, 4 UARTs (hardware serial ports), a 16 MHz crystal oscillator, a USB connection, a power jack, an ICSP header, and a reset button. It contains everything needed to support the microcontroller; simply connect it to a computer with a USB cable or power it with a AC-to-DC adapter or battery to get started. The Mega is compatible with most shields designed for the Arduino Duemilanove or Diecimila. 

     
2. Controlling Humanoid robotic hand - Using 21 potentiometers


              Using 21 potentiometer we can control all 21 servo motors at the each joints in the robotic hand . Here we know potentiometer produce analog signal ( varying current and voltage) due to variation of motion . The analog signals from controlling hand it send to the microcontroller (here arduino mega 2560) and this analog value convert to digital value at microseconds , The value of the digital signal between 0 - 1024 positions it mapped to 0 - 255 value and send to the servo motors with PULSE WIDTH MODULATION (PWM) signal with duty cycle 0  -255.

3. Robotic hand design


Please look the motors position and it movement directions.


4. Humanoid Robotic Arm helps the 5 - year old boy in south africa


Wednesday, January 1, 2014

Line Following Robot Using IR Sensor with Atmega16 IR LED PROTUES DESIGN AVR


HOME    I  ALL IN ONE TAB


Line Following Robot Using IR Sensor with Atmega16


               LDR sensors makes error signal from unwanted light source presented at surrounding therefore robot cannot travel on track . Infrared sensor gives more accuracy  path detection than LDR sensor  

               protues design file and hex code are given below . download and run the simulation to know the working of line following robot using atmega16 microcontroller

Simulation Files :

            1. Protues design file - DOWNLOAD
            2. Hex code file         - DOWNLOAD

Requirements:
          
            1. Microntroller - Atmeg16
            2. Lcd Module   - LM016L
            3. Gear Motor    - 100rpm
            4. IR - LED        - 3
            5. IR - PHOTOTRANSISTOR-3
            6. Motor Driver - L293D
            7. LED - 2 (Yellow)

            Here i used 3 IR LED with it's corresponding IR PHOTOTRANSISTOR for sensing track conditions on surface. figure below shows the working of IR led with IR phototransistor


                       The IR LED is just like any other LED, in that a current-limiting resistor is useful to control the device current and therefore the light intensity. With a 100 ohm resistor and the approximately 1.5V forward voltage drop of the IR LED, we'll have a LED current of about 35mA. That's fairly high, but more light emitted will yield more light coming back to our sensor.

                        The phototransistor is a device with an exposed silicon junction. When light passes through the plastic casing, most non-IR wavelengths are simply absorbed by the plastic, but the infrared light makes it to the sensor within. Each photon striking the silicon junction causes an electron to flow. Because this is a phototransistor and not a photodiode, this current is multiplied by the transistor's current gain, so each photon may actually cause perhaps 10 to 100 electrons to flow. This current has nowhere to go except through the 10K resistor, and as the current passes through the resistor, the voltage across the resistor rises (V=IR). This change in voltage is read by our microcontroller's Analog to Digital Converter (ADC).